The Node MCU is an open source IoT platform which is based on the ESP8266, a low-cost WiFi chip. It can do basically anything a MKR 1000 or an Arduino Uno can do, but at a fraction of the price.
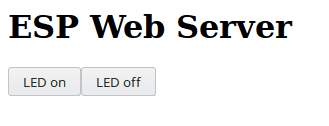
I'll show how to create a very simple web server on the NodeMCU. The board serves a simple web page that has two buttons which turn on and off the onboard led.
You can program the Node MCU board with a variety of languages such as C, Lua, or Micro-Python. The easiest way to get started with the Node MCU is using the Arduino IDE.
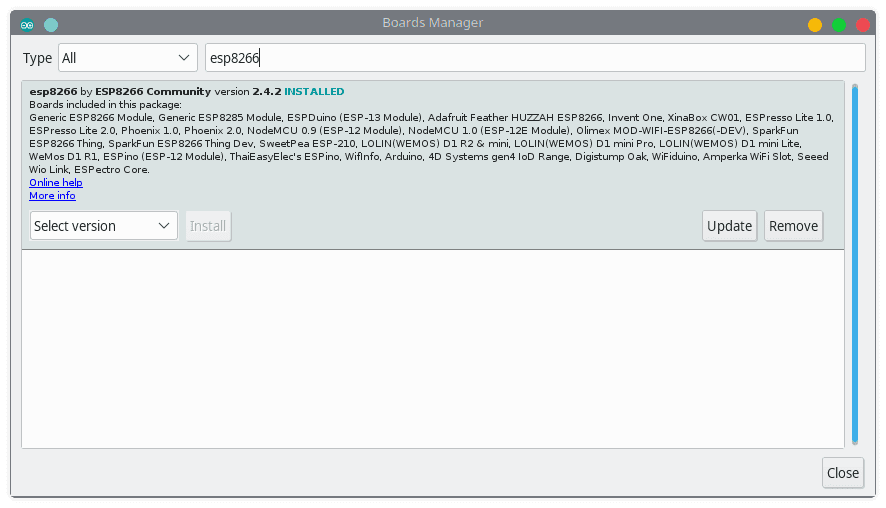
To get started working with the Node MCU, you must first install the board manager. First open up preferences and paste the http://arduino.esp8266.com/stable/package_esp8266com_index.json to the additional urls. Next you can install the ESP8266 to the IDE. Finally select NodeMCU 1.0(ESP-12E Module) as the board.

Now you are able to upload arduino code to the Node MCU just as you would an Arduino Uno. Here is the code for the server.
esp8266_simpleserver.ino:
// Include ESP8266 WiFi Libraries
#include <ESP8266WiFi.h>
#include <WiFiClient.h>
#include <ESP8266WebServer.h>

// Wifi Credentials
const char* ssid = "<wifi name>";
const char* password = "<wifi passkey>";

// Redefine Onboard LED
#define LED_BUILTIN 2

// Instantiate  server on port 80
ESP8266WebServer server(80);

// String for HTML
String page = "";

// turn led on
void ledOn(){
    server.send(200, "text/html", page);
    digitalWrite(LED_BUILTIN, LOW); // turns on LED
    delay(1000);
}

// turn led off
void ledOff(){
    server.send(200, "text/html", page);
    digitalWrite(LED_BUILTIN, HIGH); // turns off LED
    delay(1000);
}

void setup(){
    // HTML of page with inline style
    page = "<h1>ESP Web Server</h1><a href='/on'><button>LED on</button></a><a href='/off'><button>LED off</button></a>";

    // Open serial monitor
    Serial.begin(115200);

    // declare pinmode for onboard led
    pinMode(LED_BUILTIN, OUTPUT);

    // begin WiFi connection
    WiFi.begin(ssid, password);

    Serial.println("");

    // is connecting screen
    while(WiFi.status() != WL_CONNECTED){
        delay(500);
        Serial.print("#");
    }

    // Success and print IP address
    Serial.println("");
    Serial.print("Connected to: ");
    Serial.print(ssid);
    Serial.println("");
    Serial.print("IP address: ");
    Serial.print("http://");
    Serial.print(WiFi.localIP());
    Serial.println("/");

    // Create routes
    server.on("/", [](){
        server.send(200, "text/html", page);
    });

    server.on("/on", ledOn);
    server.on("/off",ledOff);

    // begin server and success message
    server.begin();
    Serial.println("Web server started!");
}


void loop(){
    server.handleClient(); // handles callback functions
}
Notice the headers at the top of the file. These libraries are installed when you install from the board manager. Make sure to change to you WiFi information. The string page stores all of the HTML content that is served. And finally I redefined the LED_BUILTIN because ime the built in led is actually on GPIO 2 whereas the firmware on my board thinks it is on GPIO 16.
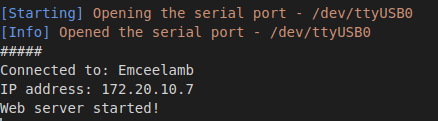
When you upload the code to the Node MCU, you can open the serial monitor where it will print the IP address assigned to the Node MCU. This means that you're connected to the network!
Now you can copy and paste the IP address into your browser and see a webpage displayed. Click the buttons to turn on and off the LED that is built into your NodeMCU!